Implementing our very own CPU
We’ll implement a subset of a system called CHIP-8, which was available to consumers in the 1970s. CHIP-8 was supported by a number of manufacturers, but it was fairly primitive even by the standards of that time. (It was created to write games rather than for commercial or scientific applications.) One device that used the CHIP-8 CPU was the COSMAC VIP. It had a single-color display with a resolution of 64x32 (0.0002 megapixels), 2 KB RAM, 1.76 MHz CPU, and sold for $275 USD. Oh, and you needed to assemble the computer yourself. It also contained games programmed by the world’s first female game developer, Joyce Weisbecker.
that's enough facts for now let's get right into the dirty parts of implementing our very own virtual cpu, you can find the code for it on my GitHub profile
TERMS RELATED TO CPU EMULATION Dealing with CPUs and emulation involves learning some terms. Take a moment to look at and understand the following:
- An operation (often shortened to “op”) refers to procedures that are supported natively by the system. You might also encounter equivalent phrases such as implemented in hardware or intrinsic operation as you explore further.
- Registers are containers for data that the CPU accesses directly. For most operations, operands must be moved to registers for an operation to function. For the CHIP-8, each register is a u8 value.
- An opcode is a number that maps to an operation. On the CHIP-8 platform, opcodes include both the operation and the operands’ registers.
Adder
let's start by defining our cpu
struct CPU {
    current_operation: u16,
    registers: [u8; 2],
}
Opcodes in our CHIP-8 cpu are only u16 while register values are all u8, for now we will start by implementing a simple adder hence we only need 2 registers.
for now we only need a cpu that can initialize, load u8 values as its registers, load its opcode and then run.
let's implement the required impl block for it.
impl CPU {
    fn read_opcode(&self) -> u16 {
        self.current_operation
    }
    fn run(&mut self) {
        // loop {
            let opcode = self.read_opcode();

            let c = ((opcode & 0xF000) >> 12) as u8;
            let x = ((opcode & 0x0F00) >>  8) as u8;
            let y = ((opcode & 0x00F0) >>  4) as u8;
            let d = ((opcode & 0x000F) >>  0) as u8;

            match (c, x, y, d) {
                (0x8, _, _, 0x4) => self.add_xy(x, y),
                _ => todo!("opcode {:04x}", opcode),
            }        // }
    }
    fn add_xy(&mut self, x: u8, y: u8) {
        self.registers[x as usize] += self.registers[y as usize];
    }
}
now there is a lot to unpack here, let's start with the run method since everything else is pretty self explanatory, when the CPU run method is called based on the opcode some operations are performed, to be more precise we separate out 4 nibbles that make up the opcode(nibbles are basically half a byte or 4 bits) we perform some & and >> operations on it to isolate the 4 individual nibbles. All of these have different meanings that are processed by cpu to match it with what operation must be performed.
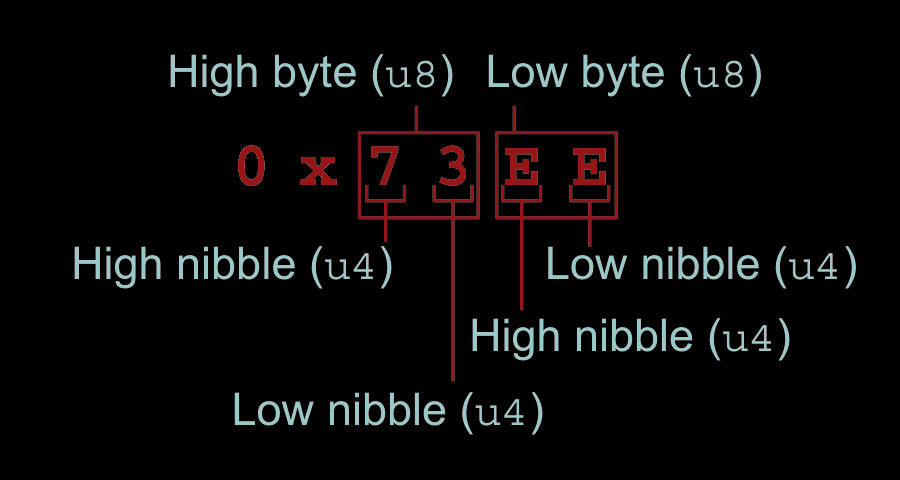
To simplify talking about the parts of each opcode, let’s introduce some standard terminology. Each opcode is made up of two bytes: the high byte and the low byte. And each byte is made up of two nibbles, the high nibble and the low nibble, respectively.
Variables used within CHIP-8 opcode descriptions
| Variable | Bit length | Location | Description |
|---|---|---|---|
| n* | 4 | low byte, low nibble | Number of bytes |
| x | 4 | high byte, low nibble | CPU register |
| y | 4 | low byte, high nibble | CPU register |
| c† | 4 | high byte, high nibble | Opcode group |
| d†*‡ | 4 | low byte, low nibble | Opcode subgroup |
| kk† | 8 | low byte, both nibbles | Integer |
| nnn† | 12 | high byte, low nibble, and low byte, both nibbles | Memory address |
- n and d occupy the same location but are used in mutually exclusive contexts.
There are three main forms of opcodes. The decoding process involves matching on the high nibble of the first byte and then applying one of three strategies.
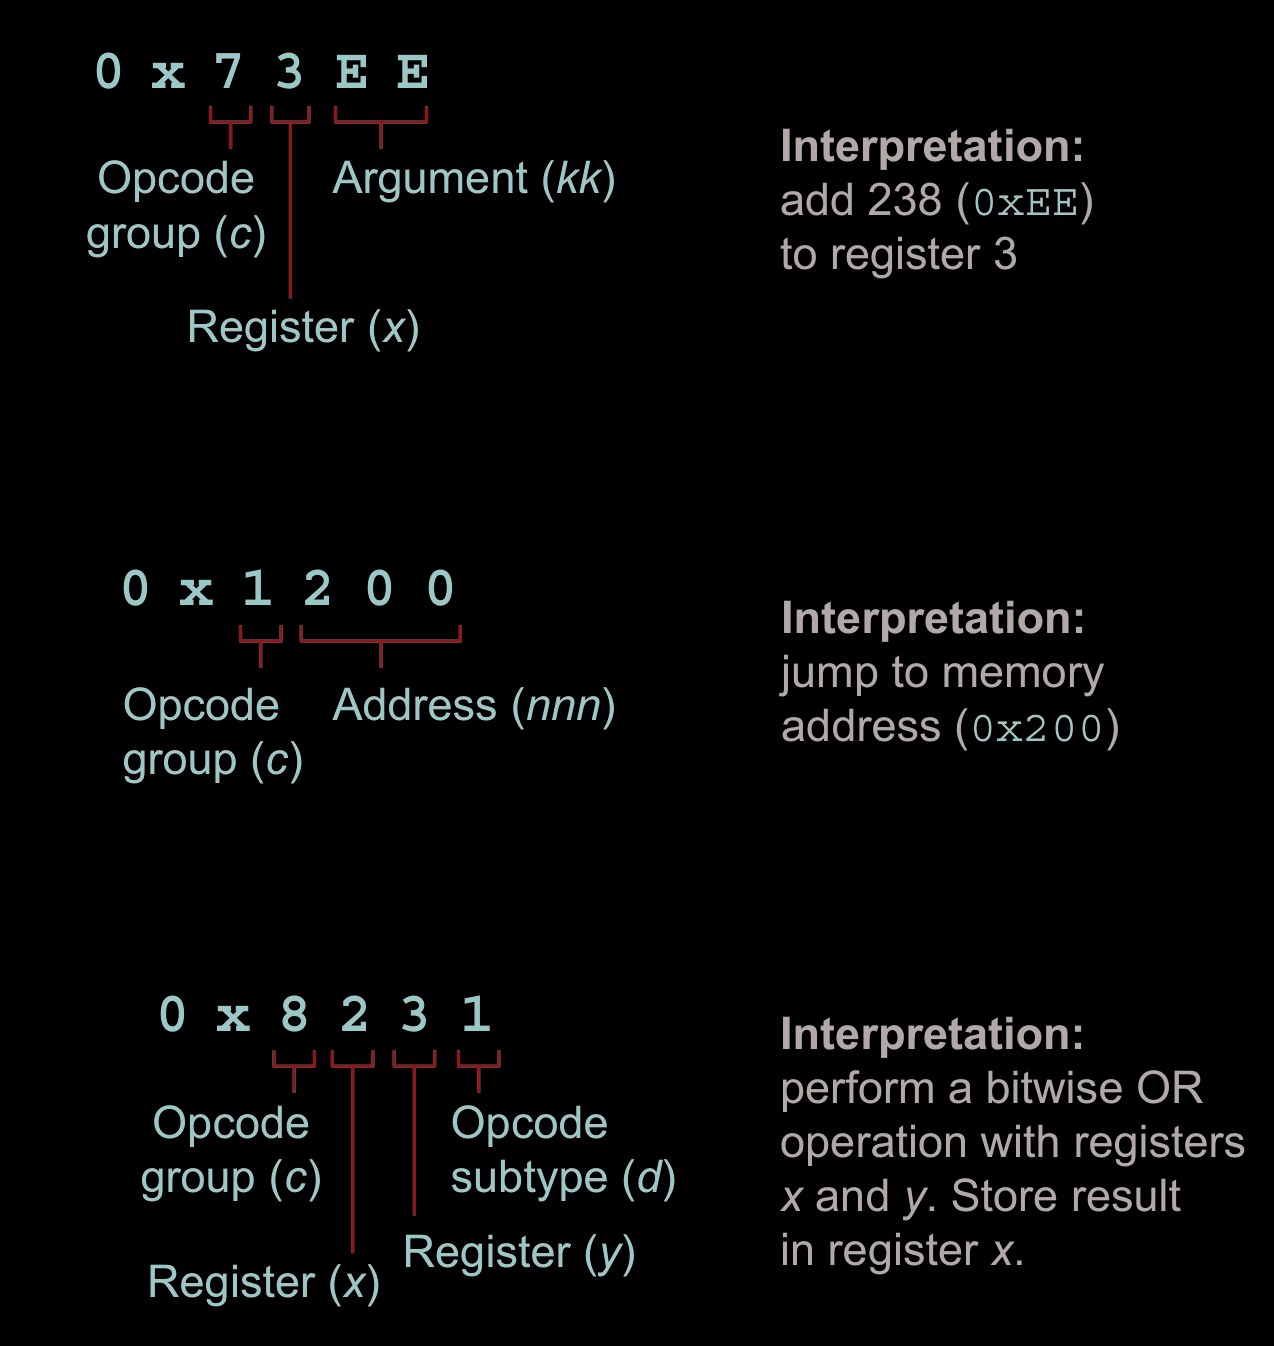
CHIP-8 opcodes are decoded in multiple ways. Which to use depends on the value of the leftmost nibble.
for our adder our opcode will be 0x8014. here 8 represents operation on two registers, 0 maps to registers[0] and 1 maps to registers[1], while 4 maps to the addition operation. The answer is loaded into the registers[0]. This brings us to our main code.
fn main() {
    let mut cpu = CPU {
        current_operation: 0,
        registers: [0; 2],
    };
    // adding 5 and 10
    cpu.current_operation = 0x8014;
    cpu.registers[0] = 5;
    cpu.registers[1] = 10;
    cpu.run();
    println!("5 + 10 = {}", cpu.registers[0]);
}
anyone with a keen eye might have noticed in the run block there was a commented out loop, this is because the cpu is almost always executing opcodes one after another in a loop instead of just once unlike in our isolated instance.
Multipliers
now that we have our very own functional adder we can go ahead and implement a simple multiplier, this would involve a loop, a stopping condition and also some memory. We also remote current operation from cpu and put it in the main loop.
let's start with how the CPU struct would look like:
struct CPU {
    registers: [u8; 16],
    position_in_memory: usize, // this is u16 in reality, but we
    // use usize just because rust allows ut to be index value
    memory: [u8; 0x1000],
}

impl CPU {
    fn read_opcode(&self) -> u16 {
        let p = self.position_in_memory; // this is u16 in reality, but we
        // use usize just because rust allows ut to be index value
        let op_byte1 = self.memory[p] as u16;
        let op_byte2 = self.memory[p + 1] as u16;
        op_byte1 << 8 | op_byte2 // they were cast as u16 so,
        // left shift doesn't just make it 0, and then resulting opcode is u16
    }
    fn run(&mut self) {
        loop {
            let opcode = self.read_opcode();
            self.position_in_memory += 2; // increment to point to the next instruction

            let c = ((opcode & 0xF000) >> 12) as u8;
            let x = ((opcode & 0x0F00) >>  8) as u8;
            let y = ((opcode & 0x00F0) >>  4) as u8;
            let d = ((opcode & 0x000F) >>  0) as u8;

            match (c, x, y, d) {
                (0,0,0,0) => {return;}, // short circuits the loop to exit
                (0x8, _, _, 0x4) => self.add_xy(x, y),
                _ => todo!("opcode {:04x}", opcode),
            }        }    }    fn add_xy(&mut self, x: u8, y: u8) {
        let arg1 = self.registers[x as usize];
        let arg2 = self.registers[y as usize];

        let (val, overflow) = arg1.overflowing_add(arg2);
        self.registers[x as usize] = val;

        if overflow {
            self.registers[0xF] = 1;
        }        else {
            self.registers[0xF] = 0;
        }
    }
}

fn main() {
    let mut cpu = CPU {
        memory: [0; 0x1000],
        position_in_memory: 0,
        registers: [0; 16],
    };

    // cpu.current_operation = 0x8014;    // we now load 0x8014 in memory a bit differently
    cpu.registers[0] = 5;
    cpu.registers[1] = 10;
    cpu.registers[2] = 10;
    cpu.registers[3] = 10;

    let mem = &mut cpu.memory;
    mem[0] = 0x80; mem[1] = 0x14; // this would add reg 1 and 0
    mem[2] = 0x80; mem[3] = 0x24; // this would add reg 2 and 0
    mem[4] = 0x80; mem[5] = 0x34; // this would add reg 3 and 0

    cpu.run();
    println!("5 + 10 + 10 + 10 = {}", cpu.registers[0]);
}
There is a lot to unpack here so let's do this bit by bit.
struct CPU {
    registers: [u8; 16],
    position_in_memory: usize, // this is u16 in reality, but we
    // use usize just because rust allows ut to be index value
    memory: [u8; 0x1000],
}
we now use 16 reg instead of 2, also we use precisely 16 since then a single hex can represent the entirety of our registers state.
What we call the “position in memory” is normally referred to as the “program counter.” As a beginner, it can be difficult to remember what the program counter’s role is. So instead, this article uses a name that reflects its usage.
you might be wondering how we might read opcodes now, well this is how...
fn read_opcode(&self) -> u16 {
    let p = self.position_in_memory; // this is u16 in reality, but we
    // use usize just because rust allows ut to be index value
    let op_byte1 = self.memory[p] as u16;
    let op_byte2 = self.memory[p + 1] as u16;
    op_byte1 << 8 | op_byte2 // they were cast as u16 so,
    // left shift doesn't just make it 0, and then resulting opcode is u16
}
this might look a bit intimidating but all it does is combines two u8 values, casts them to u16 and then combines to form a single u16 value that represents our opcode.
this is how we add our opcodes in the main() block
let mem = &mut cpu.memory;
mem[0] = 0x80; mem[1] = 0x14; // this would add reg 1 and 0
mem[2] = 0x80; mem[3] = 0x24; // this would add reg 2 and 0
mem[4] = 0x80; mem[5] = 0x34; // this would add reg 3 and 0
now lets skip to our run() block and see the kind of changes made other than the obvious loop.
fn run(&mut self) {
        loop {
            let opcode = self.read_opcode();
            self.position_in_memory += 2; // increment to point to the next instruction

            let c = ((opcode & 0xF000) >> 12) as u8;
            let x = ((opcode & 0x0F00) >>  8) as u8;
            let y = ((opcode & 0x00F0) >>  4) as u8;
            let d = ((opcode & 0x000F) >>  0) as u8;

            match (c, x, y, d) {
                (0,0,0,0) => {return;}, // short circuits the loop to exit
                (0x8, _, _, 0x4) => self.add_xy(x, y),
                _ => todo!("opcode {:04x}", opcode),
            }        }    }    fn add_xy(&mut self, x: u8, y: u8) {
        let arg1 = self.registers[x as usize];
        let arg2 = self.registers[y as usize];

        let (val, overflow) = arg1.overflowing_add(arg2);  // looks like fancy function but all it does is adds arg1 and arg2 and checks if there will be an overflow and return an appropriate tuple
        self.registers[x as usize] = val;

        if overflow {
            self.registers[0xF] = 1;
        }        else {
            self.registers[0xF] = 0;
        }
    }
DEFINING A FUNCTION AND LOADING IT INTO MEMORY
Functions are a critical part of any computer system, no cpu can function without functions! so let's see how we might go about implementing them, implementing it involves something you might have even heard of before the infamous stack. Then we also need to implement a way functions can be called and returned.
Implementing the stack
struct CPU {
    registers: [u8; 16],  // got old registers
    position_in_memory: usize, // this is u16 in reality, but we
    // use usize just because rust allows ut to be index value

    memory: [u8; 0x1000],

    stack: [u16; 16], // stack has a height of 16, so can't give it
    // more than 16 nested function calls

    stack_pointer: usize,  // the pointer to the stack, because why not?
}
that is pretty much it... stack is pretty straight forward when implementing in a cpu, but what makes it infamous is how it interacts with other methods inside CPU, you'll know more in the next section where we implement the call and ret methods.
Implementing the call and ret methods
fn call(&mut self, addr: u16) {
    let sp = self.stack_pointer;
    let stack = &mut self.stack;
    if sp > stack.len() {
        panic!("Stack overflow!")
    }
    stack[sp] = self.position_in_memory as u16;
    self.stack_pointer += 1;
    self.position_in_memory = addr as usize;
}

fn ret(&mut self) {
    if self.stack_pointer == 0 {
        panic!("Stack underflow");
    }
    self.stack_pointer -= 1;
    let call_addr = self.stack[self.stack_pointer];
    self.position_in_memory = call_addr as usize;
}
essentially what the call method does is call the series of instructions on addr and beyond until they exit using 0x00EE or 0x0000, which is when ret() is called.
This is accomplished by simply saving the current value of stack[sp] to the current position_in_memory then moving one step beyond to stack[sp+1] and the req addr of the function(instructions) becomes the
new position_in_memory, this is reversed in ret().
this is how the new run loop block looks like.
loop {
    let opcode = self.read_opcode();
    self.position_in_memory += 2; // increment to point to the next instruction

    let c = ((opcode & 0xF000) >> 12) as u8;
    let x = ((opcode & 0x0F00) >>  8) as u8;
    let y = ((opcode & 0x00F0) >>  4) as u8;
    let d = ((opcode & 0x000F) >>  0) as u8;
    let nnn = opcode & 0x0FFF;
    match (c, x, y, d) {
        (0,0,0,0) => return, // short circuits the loop to exit
        (0,0,0xE,0xE) => self.ret(), // exit condition returns the main loop
        (0x2, _, _, _) => self.call(nnn),
        (0x8, _, _, 0x4) => self.add_xy(x, y),
        _ => todo!("opcode {:04x}", opcode),
    }
}
this is how the full code would look like
struct CPU {
    registers: [u8; 16],
    position_in_memory: usize, // this is u16 in reality, but we
    // use usize just because rust allows ut to be index value    memory: [u8; 0x1000],
    stack: [u16; 16], // stack has a height of 16, so can't give it
    // more than 16 nested function calls    stack_pointer: usize,
}

impl CPU {
    fn read_opcode(&self) -> u16 {
        let p = self.position_in_memory; // this is u16 in reality, but we
        // use usize just because rust allows ut to be index value        let op_byte1 = self.memory[p] as u16;
        let op_byte2 = self.memory[p + 1] as u16;
        op_byte1 << 8 | op_byte2 // they were cast as u16 so, left shift doesn't just make it 0.
        // and then resulting opcode is u16    }

    fn call(&mut self, addr: u16) {
        let sp = self.stack_pointer;
        let stack = &mut self.stack;
        if sp > stack.len() {
            panic!("Stack overflow!")
        }        stack[sp] = self.position_in_memory as u16;
        self.stack_pointer += 1;
        self.position_in_memory = addr as usize;
    }
    fn ret(&mut self) {
        if self.stack_pointer == 0 {
            panic!("Stack underflow");
        }        self.stack_pointer -= 1;
        let call_addr = self.stack[self.stack_pointer];
        self.position_in_memory = call_addr as usize;
    }
    fn run(&mut self) {
        loop {
            let opcode = self.read_opcode();
            self.position_in_memory += 2; // increment to point to the next instruction

            let c = ((opcode & 0xF000) >> 12) as u8;
            let x = ((opcode & 0x0F00) >>  8) as u8;
            let y = ((opcode & 0x00F0) >>  4) as u8;
            let d = ((opcode & 0x000F) >>  0) as u8;
            let nnn = opcode & 0x0FFF;
            match (c, x, y, d) {
                (0,0,0,0) => return, // short circuits the loop to exit
                (0,0,0xE,0xE) => self.ret(), // exit condition returns the main loop
                (0x2, _, _, _) => self.call(nnn),
                (0x8, _, _, 0x4) => self.add_xy(x, y),
                _ => todo!("opcode {:04x}", opcode),
            }        }    }    fn add_xy(&mut self, x: u8, y: u8) {
        let arg1 = self.registers[x as usize];
        let arg2 = self.registers[y as usize];

        let (val, overflow) = arg1.overflowing_add(arg2);
        self.registers[x as usize] = val;

        if overflow {
            self.registers[0xF] = 1;
        }        else {
            self.registers[0xF] = 0;
        }    }}

fn main() {
    // initializing to zero
    let mut cpu = CPU {
        registers: [0; 16],
        memory: [0; 4096],
        position_in_memory: 0,
        stack: [0; 16],
        stack_pointer: 0,
    };
    cpu.registers[0] = 5;
    cpu.registers[1] = 10;
    cpu.registers[2] = 69;

    let mem = &mut cpu.memory;
    mem[0x000] = 0x21; mem[0x001] = 0x00; // calls the 3 instructions from 0x100 to 0x105
    mem[0x002] = 0x21; mem[0x003] = 0x00; // calls the 3 instructions from 0x100 to 0x105
    mem[0x004] = 0x21; mem[0x005] = 0x00; // calls the 3 instructions from 0x100 to 0x105
    mem[0x006] = 0x00; mem[0x007] = 0x00; // return the main loop

    mem[0x100] = 0x80; mem[0x101] = 0x14; // reg[0] = reg[0] + reg[1]
    mem[0x102] = 0x80; mem[0x103] = 0x24; // reg[0] = reg[0] + reg[2]
    mem[0x104] = 0x00; mem[0x105] = 0xEE; // exit the subroutine/function by returning

    cpu.run();

    println!("5+(10+69)*3 = {}", cpu.registers[0]);
}
This is still not complete with a few extra opcodes, it’s possible to implement multiplication and many more functions within your inchoate CPU. The last step in learning about CPUs and data is to understand how control flow works. Within CHIP-8, control flow works by comparing values in registers, then modifying position_in_memory, depending on the outcome. There are no while or for loops within a CPU. Creating these in programming languages is the art of the compiler writer.
you can find a more complete implementation here.