I Built the Internet From Scratch (So You Don’t Have To)
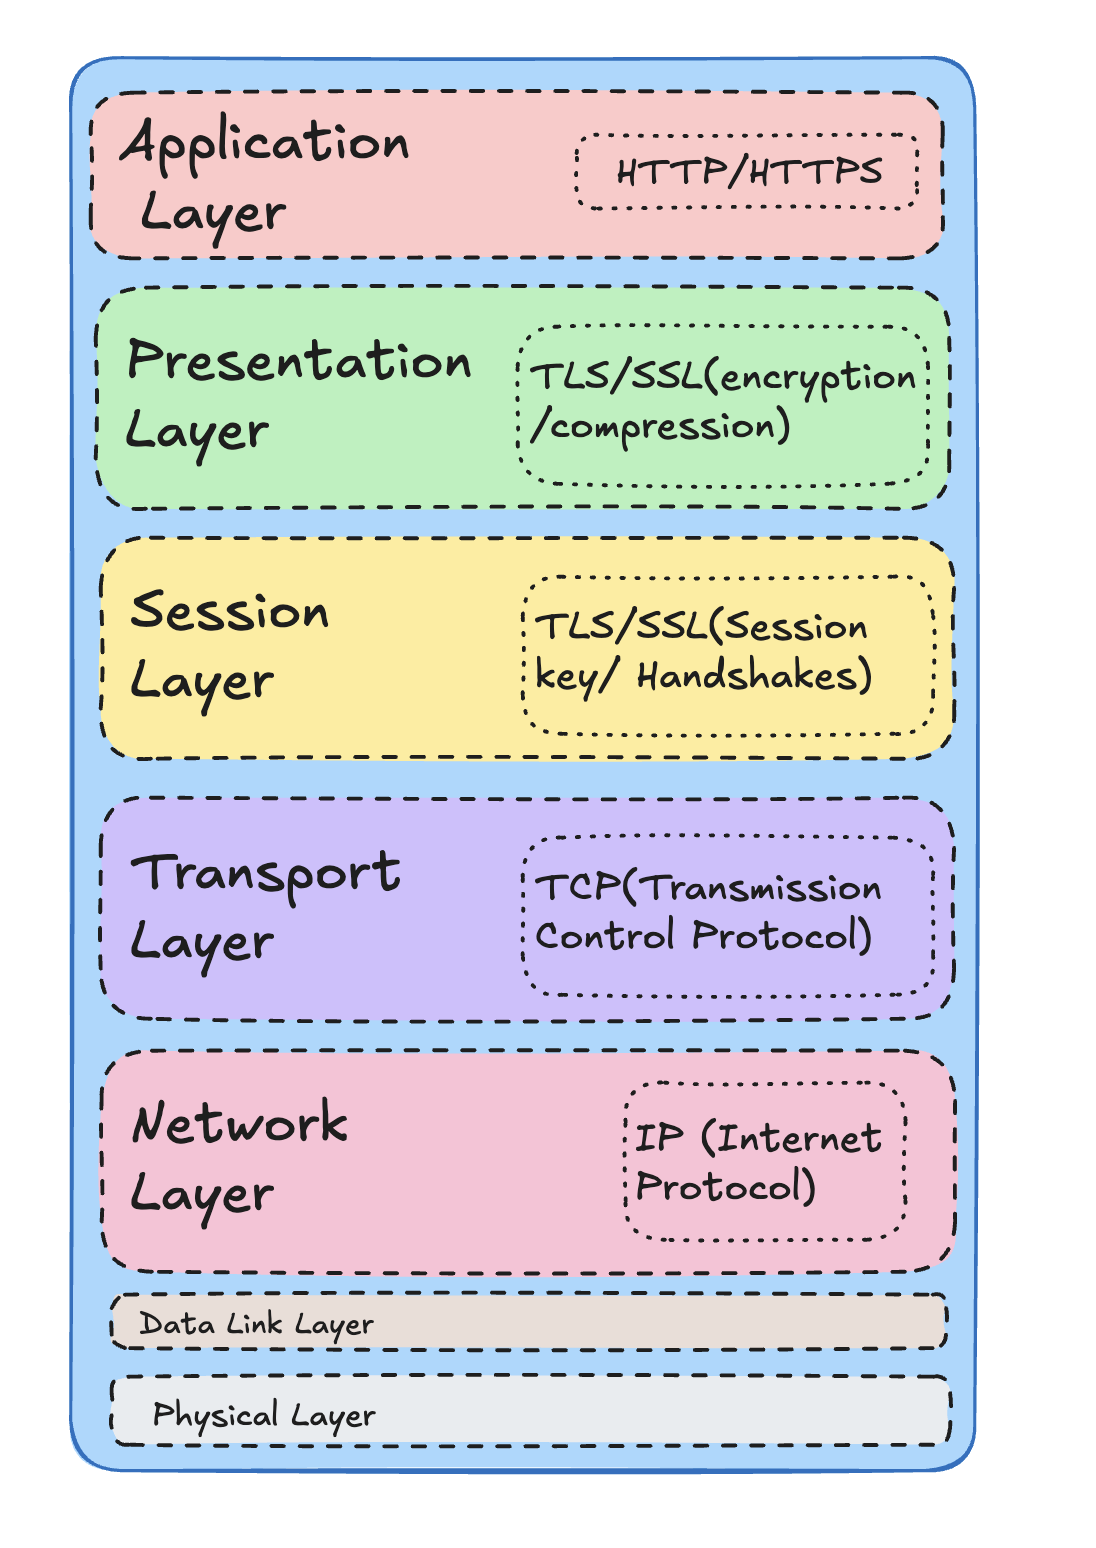
Networking is a notoriously difficult topic to cover in a single sitting. Each layer is like a fractal zoom in, and you discover yet more complexity. To the seasoned networking professionals reading this: yes, I’m glossing over a lot. Hopefully, you’ll forgive the simplifications for the sake of clarity.
All the code is on my github
Let’s start with a simple overview. The diagram below provides a (very) oversimplified snapshot of the networking stack:
Why Bother Learning Networking?
Rather than diving into the entire stack at once, let’s focus on something that’s immediately useful. If you’ve ever done any web development, you’ve already interacted with HTTP.
Most web frameworks speak HTTP. Understanding how HTTP works under the hood can help you:
- Debug tricky issues more effectively
- make sense of network stack traces and logs
- Write more performant network based applications
- Appreciate what your framework is doing behind the scenes
The Networking Stack: A glorified Onion
Here is the gist of it:
Lower layers have no idea what’s happening above them. Higher layers don’t care how their data gets delivered—just that it does.
At the bottom, it's all bits and bytes. At the top, it's rich application logic. Let's start from HTTP and peel each layer separately.
HTTP: The body and soul of the modern web
HTTP is an application-layer protocol. It’s responsible for moving content—HTML, CSS, JavaScript, images, WebAssembly, and more—between servers and browsers. It’s often used in conjunction with:
- Compression formats (e.g., Brotli, Gzip)
- Encodings (e.g., Base64)
- Lower-level protocols like TCP
Between HTTP and TCP is another critical layer: TLS (Transport Layer Security). TLS encrypts your HTTP messages, giving us HTTPS.
TLS replaced the older SSL standard and operates on top of TCP.
Layers That Bleed Together
In theory all of these layers are cleanly separated. In practice, they bleed into each other.
For instance:
- HTML can alter HTTP behavior using
<meta http-equiv>tags. - HTTP can instruct TCP with headers like
Connection: keep-alive.
It’s like water-color painting, the boundaries exist, but the colors blend.
Building It Yourself: A Networking Stack From Scratch
Despite the complexity, we’re going to take on a bold challenge: implementing as many layers of this stack as possible ourselves.
By the end of this blog post, you’ll have:
- Written your own minimal TCP implementation
- Created a DNS resolver from scratch
- Built a virtual networking device
- Sent actual HTTP requests over your custom stack
It's quite a handful but trust me it's worth it ;)
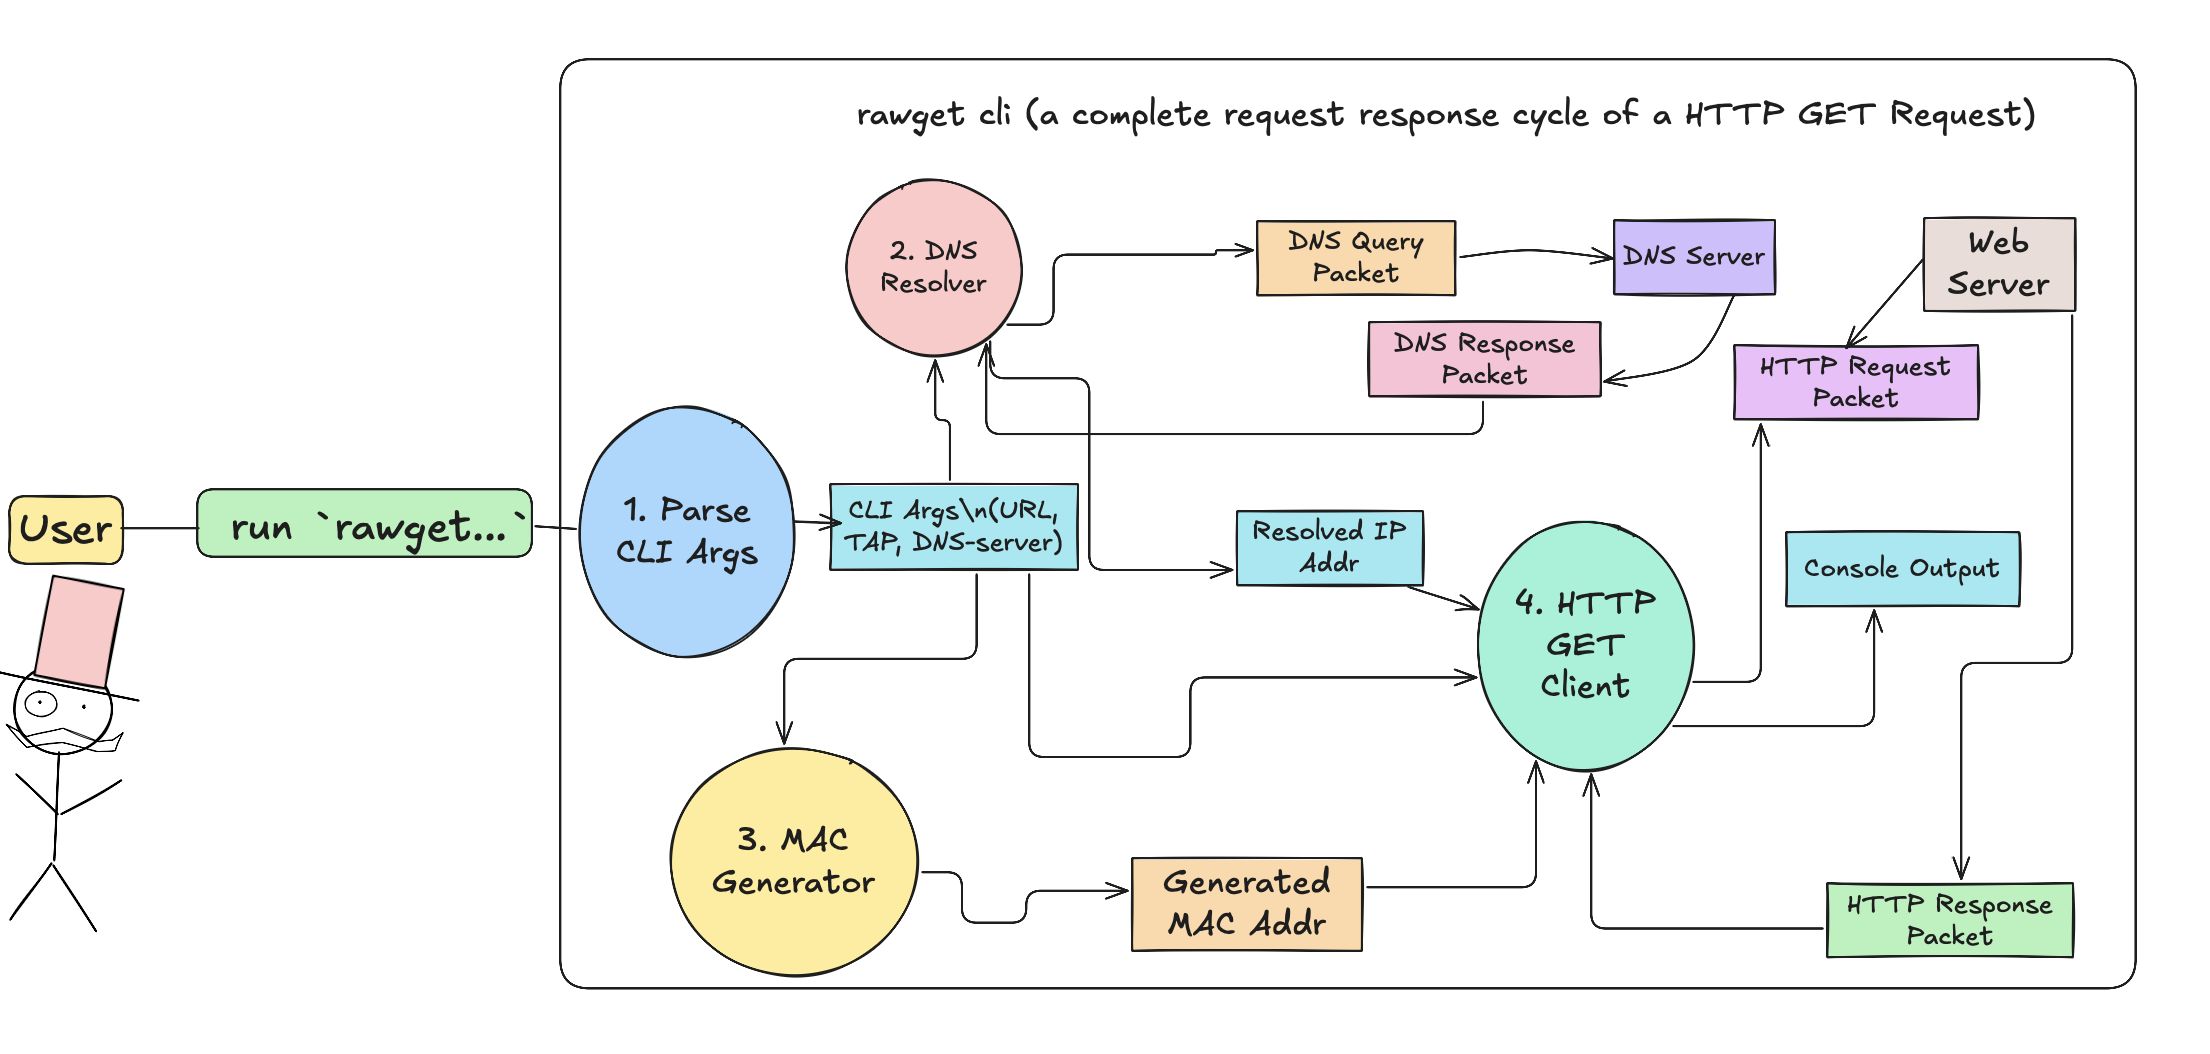
A simple HTTP GET request
The first thing we implement here would be a high level program that can correctly interpret an http request. we will use reqwest crate because it is quite feature complete, in particular it can handle cases like content redirects and also understands how to handle TLS properly.
In addition to that it also validates the content's encoding and ensures that it is sent to your application as a valid String(this is very tricky to get right especially in languages with a compiler that complains too much)
None of our lower level implementations will be doing any of that.
Here is a basic implementation of a get request in rust
use std::error::Error;
use reqwest;

#[tokio::main]
async fn main() -> Result<(), Box<dyn Error>> {
    let url = "https://karan.engineer";
    let response = reqwest::get(url).await?;
    let content = response.text().await?;
    println!("{}", content);
    Ok(())
}
#[tokio::main] is a rust macro that enables an async run time, more on that in some other blog post async rust is a beast of it's own
also don't forget to add dependencies to your cargo.toml
[dependencies]
reqwest = { version = "0.12", features = ["json"] }
tokio = { version = "1", features = ["rt-multi-thread", "macros"] }
if you've done everything correctly you should see an output like this
❯ cargo run
    Finished `dev` profile [unoptimized + debuginfo] target(s) in 0.04s
     Running `target/debug/random`
<!doctype html>
<html lang="en">
<--snip-->
</html>
If you already know a little bit of web development the above code snippet might seem pretty straightforward to you, it is a simple http get request to my blog and the response variable holds a struct representation of the server response, the response.text() method returns a Result that provides access to the HTTP body after validating the contents are a legal String.
There is still a slight itch you might be feeling right now, what the fuck is the Result type Box<dyn std::error::Error>? This is an example of rust trait object that enables runtime polymorphism in rust. More on Traits Rust Traits in Action – RPG Game Edition.
Box<dyn std::error::Error>means "any kind of error stored on the heap." It's used when you don't care about the exact error type, just that it's an error.dyn Erroris a trait object — it allows runtime polymorphism.Boxis needed because trait objects have unknown size at compile time. This lets you return flexible, generic errors from functions.
Runtime polymorphism is a concept from object-oriented programming where the actual method or behavior that gets executed is determined at runtime, rather than at compile time.
In Rust (and other languages like C++ or Java), runtime polymorphism typically involves trait objects or virtual method tables (vtables).
trait Animal {
    fn speak(&self);
}

struct Dog;
struct Cat;

impl Animal for Dog {
    fn speak(&self) {
        println!("Woof!");
    }
}

impl Animal for Cat {
    fn speak(&self) {
        println!("Meow!");
    }
}

fn make_it_speak(animal: &dyn Animal) {
    animal.speak(); // the actual method call is resolved at runtime
}
Here, &dyn Animal is a trait object, and calling speak() on it is a runtime-dispatched call — Rust uses a vtable behind the scenes to figure out which speak() method to call (Dog's or Cat's).
Using a library that knows about HTTP allows our programs to omit many details.
- Connection Management: HTTP has specific rules for managing the lifecycle of a connection. for example, when it should be closed. Libraries like
reqwesthandle these automatically. If we were to manage this manually, we’d often leave connections open longer than needed, hoping the server eventually closes them for us.- Content Decoding: Translating raw bytes (
[u8]) into usable content like aString, image, or video requires following HTTP’s rules around compression and encoding (e.g., Gzip, Brotli, Base64). Libraries handle these conversions for you, saving you from dealing with inconsistent encodings and obscure edge cases.- Port Inference: HTTP defaults to port 80 (and HTTPS to 443): A library like
reqwestimplicitly knows this — you don’t need to specify a port unless you're doing something unusual. Manual TCP-based requests, however, require you to explicitly define the correct port.- Domain Name Resolution: TCP operates purely at the IP level — it doesn’t know what a domain like
www.karan.engineermeans. HTTP libraries resolve domain names to IP addresses for you, often handling retries and caching behind the scenes.
TCP: Where Reliability Begins
A layer beneath HTTP you would find TCP(there is TLS in the middle of HTTP and HTTPS but let's not talk about that for now)
TCP or Transmission Control Protocol is what enables reliable data transfer on the web, before tcp data transfer was unreliable because of bad network connectivity and hardware constraints packages would drop all the time and there was no way to tell, tcp changed all of this.(more on this when we discuss udp)
For now let's focus on sending a HTTP GET request with raw tcp instead of a HTTP library like reqwest that we used earlier.
use std::io::{Read, Write};
use std::net::TcpStream;

fn main() {
    let domain = "example.com";
    let port = 80;
    let address = format!("{}:{}", domain, port);
    match TcpStream::connect(&address) {
        Ok(mut stream) => {
            println!("Connected to {}", address);

            let request = format!(
                "GET / HTTP/1.1\r\nHost: {}\r\nConnection: close\r\n\r\n",
                domain
            );

            stream.write_all(request.as_bytes()).unwrap();
            println!("Request sent. Awaiting response...");

            let mut response = String::new();
            stream.read_to_string(&mut response).unwrap();
            println!("Response:\n{}", response);
        }
        Err(e) => {
            eprintln!("Failed to connect: {}", e);
        }
    }
}
Most modern websites (like google.com) now use HTTPS exclusively. When you try to access them via HTTP (port 80), they respond with a 301 redirect to their HTTPS version.
Here's what happens when you try to access google.com:
❯ cargo run
   Compiling random v0.1.0 (/Users/ghost/RustroverProjects/random)
    Finished `dev` profile [unoptimized + debuginfo] target(s) in 0.66s
     Running `target/debug/random`
Connected to google.com:80
Request sent. Awaiting response...
Response:
HTTP/1.1 301 Moved Permanently
Location: http://www.google.com/
Content-Type: text/html; charset=UTF-8
Cache-Control: public, max-age=2592000
Server: gws
Connection: close

<...HTML content truncated...>
Let's break down what's happening in our code:
1. Create a connection
let domain = "example.com";
let port = 80;
let address = format!("{}:{}", domain, port);
match TcpStream::connect(&address) {
    Ok(mut stream) => { ... }
    Err(e) => { eprintln!("Failed to connect: {}", e); }
}
The TcpStream::connect() method establishes a TCP connection to the specified address (like example.com:80 for HTTP).
This method connects to port 80, which is the standard port for HTTP. If the server is reachable, you move to the next steps; if not, an error message is displayed.
A port number is a 16-bit identifier used in networking to specify a particular service or application on a device. It allows multiple services to run on the same IP address by directing incoming traffic to the correct application. Port numbers range from 0 to 65535, with some numbers reserved for standard services (e.g., port 80 for HTTP).
2. Sending the HTTP Request
let request = format!(
    "GET / HTTP/1.1\r\nHost: {}\r\nConnection: close\r\n\r\n",
    domain
);
stream.write_all(request.as_bytes()).unwrap();
Once the TCP connection is established, the next step is to manually send an HTTP request over this connection. HTTP headers are composed as a string, and then this string is converted into bytes and sent over the stream using stream.write_all(request.as_bytes()):
This request is a simple HTTP GET request that asks for the root page (/) of the domain. The Connection: close header indicates that the connection should be closed after the response is received.
3. Reading the Response
let mut response = String::new();
stream.read_to_string(&mut response).unwrap();
println!("Response:\n{}", response);
After sending the request, you wait for the server to respond. The response is read from the stream and stored in a String:
This method reads the entire HTTP response into a string. The response might contain a variety of HTTP headers and the body of the response (which could be HTML, JSON, etc.).
DNS: Converting a hostname to an IP address
So far we have used domain names rather than raw IP addresses but to send messages over the internet, the IP (internet protocol) address is required. TCP knows nothing about domain names. To convert a domain name to an IP address, we rely on the Domain Name System (DNS) and its process called domain name resolution. We’re able to resolve names by asking a server, which can recursively ask other servers. DNS requests can be made over TCP, including encryption with TLS, but are also sent over UDP (User Datagram Protocol). We’ll use DNS here because it’s more useful for learning purposes.
Many companies provide free DNS services switching to Google or Cloudflare could potentially enhance your internet experience as Cloudflare is much faster. Most operating systems like windows use DHCP-provided DNS which depends on your ISP and browsers like Chrome and Arc might use google public DNS.
A complete guide to this can be found on adam's blog.
however for this blog I will use some external crates that implement RFC 1035 do the heavy lifting,
| Term | Definition | Representation in Code (Rust hickory-dns) |
| Opcode | An Opcode enumerator that signifies the type of operation being performed in a DNS message. Think of it as a sub-type of the Message Type, providing extensibility for different functionalities. RFC 1035 defines Query and Status, while later RFCs introduced Notify and Update. | Defined in hickory_dns::op::OpCode as a pub enum OpCode |
| Domain Name | A text string that uniquely identifies a location in the DNS hierarchy. You likely encounter these every day, like google.com. It's made up of labels separated by periods, and can include a single dot for the root domain. | Defined in hickory_dns::domain::Name as a pub struct Name { fqdn: bool, labels: Vec<Label> }. fqdn stands for fully qualified domain name. |
| Message | The fundamental unit of communication in DNS. A message is a container for all the information exchanged between DNS clients and servers. It includes a header, questions, answers, and potentially additional and authority records. | Defined in hickory_dns::Message which encapsulates various components like header, questions, answers, additional, etc. It also handles options like EDNS. |
| Message Type | Specifies the type of DNS message, such as a query or a response. This field indicates the purpose of the message and influences how it's processed. | Defined in hickory_dns::op::MessageType as a pub enum MessageType { Query, Response} |
| Message ID | A unique identifier assigned to each DNS message. This helps in matching responses to their corresponding queries, especially when multiple queries are in flight. | Represented as a u16 in the message header. |
| Resource Record | A fundamental data structure in DNS that contains information about a specific resource, like an IP address for a domain name. Resource records have a type, class, Time to Live (TTL), and data. | Defined in hickory_dns::rr::RecordType as a pub enum RecordType { A, AAAA, CNAME, ANY, Unknown(u16), ZERO}. It also encompasses other record components. |
| Query | A section within a DNS message that specifies the question being asked by the client. It includes the domain name, the desired resource record type, and the class. | Defined in hickory_dns::op::Query as a pub struct Query { name: Name, query_type: RecordType, query_class: DNSClass}. |
As you might be able to see this protocol has way too many types and options so the process of constructing a simple message of "hey dns server, what is the address of example.com?" is too complex and tedious.
We’re now in a position where we can meaningfully implement the code for this RFC. It will have the following structure
- Parses cli args
- Builds a DNS message using hickory-dns types
- Converts the structured data into a stream of bytes
- Sends those bytes across the wire
- Accept the response from the server and decode it
essentially this is the expectation of such a cli tool
$ kdns -a www.example.com
23.192.228.80
this is a demonstration of the RFC 1035 schematic

now implementing basic cli parsing to get a simple domain name from cli is trivial, however one must also think about validation
Implementing cli parsing
use clap::Parser;
use std::fmt;
use std::str::FromStr;

#[derive(Debug, Clone)]
struct Domain {
    name: String,
}

impl fmt::Display for Domain {
    fn fmt(&self, f: &mut fmt::Formatter<'_>) -> fmt::Result {
        write!(f, "{}", self.name)
    }
}

impl FromStr for Domain {
    type Err = String;

    fn from_str(s: &str) -> Result<Self, Self::Err> {
        if is_valid_domain(s) {
            Ok(Domain { name: s.to_string() })
        } else {
            Err(format!("Invalid domain: {}", s))
        }
    }
}

fn is_valid_domain(domain: &str) -> bool {
    if domain.len() > 253 {
        return false;
    }

    let labels: Vec<&str> = domain.split('.').collect();
    if labels.len() < 2 {
        return false;
    }

    for label in labels {
        if label.is_empty()
            || label.len() > 63
            || label.starts_with('-')
            || label.ends_with('-')
            || !label.chars().all(|c| c.is_ascii_alphanumeric() || c == '-')
        {
            return false;
        }
    }

    true
}

#[derive(Parser, Debug)]
#[command(version, about, long_about = None)]
struct Args {
    #[arg(short, long)]
    a: Domain,
}

fn main() {
    let args = Args::parse();
    let domain = args.a;
    println!("Hello {}!", domain);
}
the above implementation uses clap to extract the domain name from the cli args using clap and it also implements basic validation from the RFC dns standard.
now we should think about the non trivialities how would we implement the message and send it to a dns server and then parse it's response.
As long as we use the hickory crate for types such a thing is trivial to accomplish
use clap::Parser;
use std::fmt;
use std::net::UdpSocket;
use std::str::FromStr;
use hickory_proto::op::{Message, MessageType, OpCode, Query};
use hickory_proto::rr::{Name, DNSClass, RecordType};
use hickory_proto::serialize::binary::{BinDecodable, BinEncodable, BinEncoder};
use hickory_proto::rr::RData;

#[derive(Debug, Clone)]
struct Domain {
    name: String,
}

impl fmt::Display for Domain {
    fn fmt(&self, f: &mut fmt::Formatter<'_>) -> fmt::Result {
        write!(f, "{}", self.name)
    }
}

impl FromStr for Domain {
    type Err = String;

    fn from_str(s: &str) -> Result<Self, Self::Err> {
        if is_valid_domain(s) {
            Ok(Domain { name: s.to_string() })
        } else {
            Err(format!("Invalid domain: {}", s))
        }
    }
}

fn is_valid_domain(domain: &str) -> bool {
    if domain.len() > 253 {
        return false;
    }

    let labels: Vec<&str> = domain.split('.').collect();
    if labels.len() < 2 {
        return false;
    }

    for label in labels {
        if label.is_empty()
            || label.len() > 63
            || label.starts_with('-')
            || label.ends_with('-')
            || !label.chars().all(|c| c.is_ascii_alphanumeric() || c == '-')
        {
            return false;
        }
    }

    true
}

#[derive(Parser, Debug)]
#[command(version, about = "Manual DNS Client", long_about = None)]
struct Args {
    #[arg(short, long)]
    a: Domain,
}

fn main() {
    let args = Args::parse();
    println!("Querying A record for {}", args.a);

    let domain = args.a.name;

    // Construct DNS message
    let mut message = Message::new();
    message
        .set_id<u16>()
        .set_message_typeQuery
        .set_op_codeQuery
        .set_recursion_desired(true);

    let name = Name::from_str(&domain).expect("Invalid domain for Name");
    let query = Query::query(name, RecordType::A);
    message.add_query(query);

    let mut buf = Vec::with_capacity(512);
    {
        let mut encoder = BinEncoder::new(&mut buf);
        message.emit(&mut encoder).expect("Failed to encode DNS message");
    }

    // Send UDP packet to DNS server
    let socket = UdpSocket::bind("0.0.0.0:0").expect("Failed to bind socket");
    socket
        .send_to(&buf, ("8.8.8.8", 53))
        .expect("Failed to send query");

    let mut response_buf = [0u8; 512];
    let (len, _) = socket.recv_from(&mut response_buf).expect("Failed to receive response");

    let response = Message::from_bytes(&response_buf[..len]).expect("Failed to parse response");

    for answer in response.answers() {
	    // filter ip v4 adresses
        if let RData::A(ipv4) = answer.rdata() {
            println!("{}", ipv4);
        }
    }
}
looking at the complete code might be overwhelming so I'll break it down for you. let's start with message construction since it lies at the heart of all of this.
Sending the message
let mut message = Message::new();
message
    .set_id<u16>()
    .set_message_typeQuery
    .set_op_codeQuery
    .set_recursion_desired(true);

let name = Name::from_str(&domain).expect("Invalid domain for Name");
let query = Query::query(name, RecordType::A);
message.add_query(query);
We create a DNS query message using the hickory-proto crate’s Message struct. The message is structured as follows:
- Message ID
A random 16-bit identifier <u16>() that allows the client to match the server’s response to this specific query.- Message Type
Set toMessageType::Queryto indicate this is a question for the DNS server.- OpCode
Set toOpCode::Queryto specify a standard DNS query (as opposed to other operations like Update or Notify).- Recursion Desired
Set totrueto ask the DNS server to recursively resolve the domain name if it doesn’t have the answer locally (e.g., by querying other DNS servers).- Query Section
AQueryobject is created with:
- The domain name (converted to a
Namestruct, which handles DNS’s wire format).- The record type
RecordType::A, which requests an IPv4 address (you could useAAAAfor IPv6 instead).
Serializing the Message to Bytes
let mut buf = Vec::with_capacity(512);
{
    let mut encoder = BinEncoder::new(&mut buf);
    message.emit(&mut encoder).expect("Failed to encode DNS message");
}
DNS messages are sent over the network as a stream of bytes, so we need to serialize the Message struct into the wire format defined by RFC 1035. The hickory-proto crate’s BinEncoder handles this:
- We allocate a
Vec<u8>with a capacity of 512 bytes, which is the maximum size for a DNS message over UDP without extensions (EDNS). - The BinEncoder converts the Message (including its header, query, and flags) into a byte sequence that the DNS server can understand.
- The resulting buf contains the encoded DNS query, ready to be sent over the network.
This step is critical because DNS servers expect a specific binary format, and manually crafting these bytes would be error-prone without a library like hickory-proto.
Sending the Query Over UDP
let socket = UdpSocket::bind("0.0.0.0:0").expect("Failed to bind socket");
socket
    .send_to(&buf, ("8.8.8.8", 53))
    .expect("Failed to send query");
Unlike the TCP-based HTTP request we implemented earlier, DNS queries typically use UDP for speed and simplicity:
- We create a UdpSocket bound to 0.0.0.0:0, which lets the operating system assign an available local port.
- We send the serialized query (buf) to Google’s public DNS server at 8.8.8.8 on port 53, the standard port for DNS.
- UDP is connectionless, so send_to immediately dispatches the packet without establishing a handshake (unlike TCP).
UDP is ideal for DNS because queries are small, and the overhead of TCP’s connection setup would be unnecessary for most cases. However, DNS can fall back to TCP for larger responses or when reliability is critical (e.g., zone transfers).
Unlike TCP, UDP doesn’t support long-lived or duplex connections—every message is a one-off.
But DNS still manages two-way communication. How?
DNS fakes two-way communication by flipping roles mid-exchange:
-
The DNS client starts as a UDP client, sending a query.
-
When the DNS server replies, the client temporarily acts as a UDP server to receive the response.
This clever role swap allows request-response behavior without needing TCP.
Here’s the simplified flow:
| 🧭 Stage | 🧑💻 DNS Client Role | 🖥️ DNS Server Role |
|---|---|---|
| Request sent from DNS client | UDP client | UDP server |
| Reply sent from DNS server | UDP server | UDP client |
This might seem trivial at first but it gets tricky to debug quickly if you don't already know about it
TCP (Transmission Control Protocol) is a connection-oriented protocol that ensures reliable data transfer using acknowledgments, error checking, and retransmission. It's used where accuracy is crucial, like web browsing and file transfers.
UDP (User Datagram Protocol) is a connectionless protocol that sends packets without establishing a connection, offering faster transmission but without reliability. It's ideal for real-time applications like video streaming or online gaming.
Differences:
- TCP is reliable; UDP is not.
- TCP has connection setup (3-way handshake); UDP doesn’t.
- TCP guarantees packet order; UDP may deliver out of order.
- TCP is slower due to overhead; UDP is faster but less safe.
Similarities:
- Both use IP as the underlying protocol.
- Both deliver data using ports to identify applications.
- Both are part of the transport layer in the OSI model.
Receiving and Parsing the Response
let mut response_buf = [0u8; 512];
let (len, _) = socket.recv_from(&mut response_buf).expect("Failed to receive response");

let response = Message::from_bytes(&response_buf[..len]).expect("Failed to parse response");

for answer in response.answers() {
    if let RData::A(ipv4) = answer.rdata() {
        println!("{}", ipv4);
    }
}
Finally, we receive the DNS server’s response and extract the IP address:
- We allocate a 512-byte buffer (response_buf) to store the incoming UDP packet.
- recv_from waits for a response and returns the number of bytes received (len).
- We parse the response bytes back into a Message struct using Message::from_bytes.
- We iterate over the answers section of the response, which contains resource records (RRs).
- For each answer, we check if it’s an A record (IPv4 address) using pattern matching on RData::A. If it is, we print the IP address (e.g., 93.184.216.34 for www.example.com).
Why This Matters in the Networking Stack
The DNS resolver operates at the application layer of the networking stack, just like HTTP, but it’s a prerequisite for most network communication. Without DNS, we’d need to hardcode IP addresses (e.g., 93.184.216.34 instead of www.example.com), which is impractical because:
- IP addresses can change (e.g., due to load balancing or server migrations).
- Domain names are easier for humans to remember and use.
- DNS supports advanced features like load balancing, failover, and content delivery networks (CDNs).
In our earlier TCP example, we used TcpStream::connect("example.com:80"), which implicitly resolved the domain name to an IP address using the operating system’s DNS resolver. By implementing our own DNS resolver, we’ve peeled back another layer of the stack, revealing how domain names are translated into actionable network addresses.
How about you try and implement the caching part on your own now, it's a simple kv store, shouldn't be hard.
Our overall task was to make a simple HTTP GET request but HTTP is built on TCP, and because we only knew a domain name and not an ip address, so we needed to use DNS. DNS is primarily delivered over UDP so we needed to take a diversion and learn about UDP. Now it's time we get back to TCP. Now that we have an IP address to connect to, we can dig deeper, The internet protocol enables devices to contact each other via their ip addresses, but all devices also have a unique identifier that's independent of the network they are connected to. I'm taking about MAC ADDRESSES
MAC Addresses and their background
Back in the day ethernet-based networking and internet started independently with different set of goals, Ethernet's focus was LAN or Local Area Networks. The internet however was developed to enable communication between networks. The ethernet is the addressing system used by physical link devices and radio link devices(like WiF, bluetooth and other wireless tech)
A more apt explanation would be that any two devices that share electrons must use MAC or Media Access Control addresses.
So let me tell you about some MAC Address "ground" rules this will be important when we generate our own for our virtual networks.
- IP addresses are hierarchical, but MAC addresses are not. Addresses appearing close together numerically are not close together physically, or organizationally.
- MAC addresses are 48 bits (6 bytes) wide. IP addresses are 32 bits (4 bytes) wide for IPv4 and 128 bits (16 bytes) for IPv6.
Types of MAC Addresses
There are two main types of MAC (Media Access Control) addresses:
Universally Administered Addresses (UAA): These are assigned during the manufacturing process. The first portion of the address is a prefix allocated by the IEEE Registration Authority, while the remaining bits are determined by the manufacturer.
Locally Administered Addresses (LAA): These are assigned by users or software, rather than by the manufacturer. When setting a MAC address manually, it should be configured in the local form to avoid conflicts with universally administered addresses.
MAC Address Modes
MAC addresses operate in two modes:
- Unicast: Intended for communication with a single, specific device.
- Multicast: Intended for communication with a group of devices.
The behavior of frame transmission is identical for both modes. The distinction lies in how devices interpret and respond to incoming frames.
In the Ethernet protocol, a frame refers to a unit of data at this level of communication. Equivalent terms include packet, wrapper, or envelope.
Unicast vs. Multicast Addresses
Unicast addresses are used for communication between two specific devices—such as a laptop and a router—that are in direct contact. While wireless access points introduce some complexity, the core concept remains the same.
In contrast, multicast addresses are designed so that multiple devices can receive the same packet.
It's important to note that the term unicast can be a bit misleading. Even in unicast communication, more than two devices may be involved in transmitting the data. The use of a unicast address simply determines how devices behave when they receive a packet—it does not affect the data that is actually transmitted over the medium (whether it's a physical cable or wireless signal).
Generating Mac Addresses
In the begging of the blog post I mentioned that you would get to build your own virtual hardware, so in order to convince anything to talk to us we need to assign our virtual device a MAC address. This is so that it believes or pretends that we are real.


The above images provide you with a understanding of how mac addresses are structured and how we can on demand generate our own ones.
Below is a simple implementation of local unicast mac address generator from scratch using just rand crate.
use rand::Rng;
use std::fmt;

/// Represents a 6-byte MAC address.
#[derive(Debug, Clone, Copy)]
pub struct MacAddress(pub [u8; 6]);

impl MacAddress {
    /// Generates a new locally administered unicast MAC address.
    pub fn new() -> Self {
        let mut rng = rand::thread_rng();
        let mut bytes = [0u8; 6];

        rng.fill(&mut bytes);

        // Clear the multicast bit (bit 0), set the locally administered bit (bit 1)
        bytes[0] &= 0b1111_1110; // unset bit 0 → unicast
        bytes[0] |= 0b0000_0010; // set bit 1 → locally administered

        MacAddress(bytes)
    }
}

impl fmt::Display for MacAddress {
    fn fmt(&self, f: &mut fmt::Formatter<'_>) -> fmt::Result {
        let bytes = &self.0;
        write!(
            f,
            "{:02x}:{:02x}:{:02x}:{:02x}:{:02x}:{:02x}",
            bytes[0], bytes[1], bytes[2], bytes[3], bytes[4], bytes[5]
        )
    }
}
-
&= 0b1111_1110→ clears bit 0 to make it a unicast address -
|= 0b0000_0010→ sets bit 1 to mark it locally administered (vs globally assigned)
Creating a virtual networking device
Integrating with raw TCP packets(unless you are on linux) is non trivial because the OS starts being a little bitch unless you're on linux of course. On linux you can create a proxy device that non-superusers can use to communicate directly.
As such I would recommend using a linux virtual machine or a docker container for the next sections.
sudo \
	ip tuntap \
	add \
	mode tap \
	name tap-rust \
	user $USER
sudois not needed if you're running as root usertuntaptells ip that we're managing TUN/TAP devices$USERgrant access to non-root user accounttap-rustis unique name of your device
when this is successful nothing is printed, but you can verify it with
ip tuntap list
tap-rust: tap persist user 501
Now that we have created a network device, we also need to allocate an ip address for it and tell our system to forward packets to it.
this should enable it
sudo ip link set tap-rust up # establishes a network device called tap-rust and activates it
sudo ip addr add 192.168.42.100/24 dev tap-rust # assigns this ip to tap-rust device
sudo iptables \
	-t nat \
	-A POSTROUTING \
	-s 192.168.42.100/24 \
	-j MASQUERADE
This enables internet packets to reach the source IP address masks (-s 192.168.42.100/24) by appending a rule(-A POSTROUTING) that dynamically maps IP addresses to a device(-j MASQUERADE)
sudo sysctl net.ipv4.ip_forward=1
this instructs the kernel to enable IPv4 packet forwarding
you can remove this device(once you have completed this section) using this
sudo ip tuntap del mode tap name tap-rust
"RAW" HTTP GET request
Now that you have learned how to build a virtual network device we finally have all the knowledge we need to take on the challenge of using HTTP at the TCP level.
The source code for this section is mostly derived from the previous sections,
All the source code is also available on my github
this is the tree structure of our project
├── Cargo.lock
├── Cargo.toml
├── src
│   ├── dns.rs
│   ├── ethernet.rs
│   ├── http.rs
│   └── main.rs
To continue first let's recap how all these components fit together while making a simple get request
you can find the entire code here
the only piece of this that might feel new to you would be http.rs, so let's talk about it
use std::fmt;
use std::io;
use std::net::{IpAddr, Ipv4Addr};
use std::os::unix::io::AsRawFd;
use std::str;
use rand;
use smoltcp::iface::{Config, Interface, SocketSet};
use smoltcp::phy::{wait as phy_wait, Device, Medium, TunTapInterface};
use smoltcp::socket::{tcp::ConnectError, tcp::RecvError, tcp::SendError, tcp::Socket, tcp::SocketBuffer};
use smoltcp::time::Instant;
use smoltcp::wire::{EthernetAddress, HardwareAddress, IpAddress, IpCidr, Ipv4Address};
use url::Url;

#[derive(Debug)]
enum HttpState {
    Connect,
    Request,
    Response,
}

#[derive(Debug)]
pub enum UpstreamError {
    Network(ConnectError),
    Send(SendError),
    Recv(RecvError),
    InvalidUrl,
    ContentUtf8Error,
    IoError,
}

impl fmt::Display for UpstreamError {
    fn fmt(&self, f: &mut fmt::Formatter<'_>) -> fmt::Result {
        write!(f, "{:?}", self)
    }
}

impl From<ConnectError> for UpstreamError {
    fn from(error: ConnectError) -> Self {
        UpstreamError::Network(error)
    }
}

impl From<SendError> for UpstreamError {
    fn from(error: SendError) -> Self {
        UpstreamError::Send(error)
    }
}

impl From<RecvError> for UpstreamError {
    fn from(error: RecvError) -> Self {
        UpstreamError::Recv(error)
    }
}

impl From<std::str::Utf8Error> for UpstreamError {
    fn from(error: std::str::Utf8Error) -> Self {
        UpstreamError::Content(error)
    }
}

impl From<io::Error> for UpstreamError {
    fn from(error: io::Error) -> Self {
        UpstreamError::Io(error)
    }
}

fn random_port() -> u16 {
    49152 + rand::random::<u16>() % 16384
}

pub fn get(
    mut device: TunTapInterface,
    mac: EthernetAddress,
    addr: Ipv4Addr,
    url: Url,
) -> Result<(), UpstreamError> {
    let domain_name = url.host_strInvalidUrl?;
    let fd = device.as_raw_fd();

    // Configure interface
    let mut config = match device.capabilities().medium {
        Medium::Ethernet => Config::new(mac.into()),
        Medium::Ip => Config::newIp,
        Medium::Ieee802154 => todo!(),
    };
    config.random_seed = rand::random();

    let mut iface = Interface::new(config, &mut device, Instant::now());
    iface.update_ip_addrs(|ip_addrs| {
        ip_addrs
            .pushv4(192, 168, 42, 1), 24)
            .unwrap();
    });
    iface
        .routes_mut()
        .add_default_ipv4_routenew(192, 168, 42, 100)
        .unwrap();

    // Create TCP socket
    let tcp_rx_buffer = SocketBuffer::new(vec![0; 1024]);
    let tcp_tx_buffer = SocketBuffer::new(vec![0; 1024]);
    let tcp_socket = Socket::new(tcp_rx_buffer, tcp_tx_buffer);
    let mut sockets = SocketSet::new(vec![]);
    let tcp_handle = sockets.add(tcp_socket);

    let http_header = format!(
        "GET {} HTTP/1.1\r\nHost: {}\r\nConnection: close\r\n\r\n",
        url.path(),
        domain_name
    );

    let mut state = HttpState::Connect;

    loop {
        let timestamp = Instant::now();

        // poll returns PollResult, so we drop the `?`
        iface.poll(timestamp, &mut device, &mut sockets);

        let socket = sockets.get_mut::<Socket>(tcp_handle);
        let cx = iface.context();

        state = match state {
            HttpState::Connect if !socket.is_active() => {
                socket.connect(cx, (addr, url.port().unwrap_or(80)), random_port())?;
                HttpState::Request
            }

            HttpState::Request if socket.may_send() => {
                socket.send_slice(http_header.as_ref())?;
                HttpState::Response
            }

            HttpState::Response if socket.can_recv() => {
                socket.recv(|data| {
                    println!("{}", str::from_utf8(data).unwrap_or("(invalid utf8)"));
                    (data.len(), ())
                })?;
                HttpState::Response
            }

            HttpState::Response if !socket.may_recv() => break,

            _ => state,
        };

        phy_wait(fd, iface.poll_delay(timestamp, &sockets))?;
    }

    Ok(())
}
yeah it's heavy and messy to take into all at once, but if you go at it piece by pice it's not really that complicated but it's not that hard once you break it down
This code uses a virtual network interface (TUN/TAP) and manually handles networking using the
smoltcplibrary.
It sets up a virtual Ethernet interface with a fake IP (
192.168.42.1) and a gateway (192.168.42.100).It creates a TCP socket, just like how browsers use TCP to talk to websites.
It builds an HTTP GET request string like:
GET /path HTTP/1.1
Host: example.com
Connection: close
It uses a state machine to handle the steps:
- Connect to the server (TCP handshake)
- Send the HTTP request
- Read the HTTP response
It keeps looping, polling the network interface for activity.
Once it connects, it sends the request.
Then it reads and prints the server’s response (HTML, JSON, etc.).
When the server closes the connection, it exits the loop and finishes.
It handles different kinds of errors (invalid URL, TCP errors, invalid UTF-8, etc.).
It uses a random port on the client side to mimic real client behavior.
This project is a wildly ambitious one...it brings together all the pieces of the puzzle. It spans dozens of lines of code, yet it’s still less capable than a simple GET request you might make while testing a “Hello, world” API.
That contrast highlights just how complex networking really is, and how many layers lie beneath even the simplest operations. Hopefully, this blog has uncovered some fascinating rabbit holes for you to explore. And perhaps surprisingly, there are still more layers waiting to be unwrapped.
Well done for making it all the way through this lengthy and challenging blog.
~K